Find
You can use ![]() or press
or press Ctrl+F to open the search window.

Enter your query in the corresponding field and press the Find button or the Enter key. Enabling the Search in closed processes option activates the search in closed sequences and diagrams.
The result will be displayed in a table below the query string. To navigate to the found element, double-click the desired element in the results table.
Table Settings
It is possible to choose which columns should be displayed in the search results and which should not. To do this, right-click on the any column title and select the Show column chooser command in the context menu.

A column selection window will open. Mark the columns that should be displayed in the table, then close this window. Tables in Studio retain their last state.
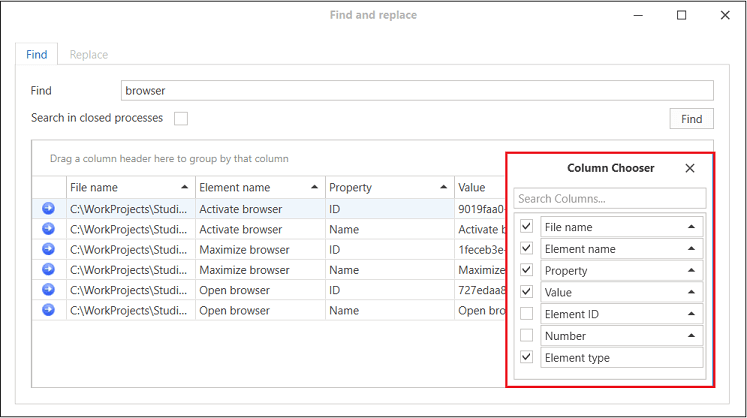
Pay attention to the Number column: it displays information about the number assigned to the element during the process*.
You can turn automatic numbering of elements on/off in the Settings ➝ General ➝ Personalization menu using the Show numbering parameter.
Find and Replace
Studio provides the ability to replace the found value with a value specified by the user. The replacement function is designed to reduce the time required to make changes to an RPA project. By default, replacement functionality is turned off.
How to use the replacement function:
- Go to the File > Settings > General menu and check the “Find and replace” function checkbox.
- Open the search window:
- click the Find button on the “General” menu tab;
- or use
Ctrl+F.
- Follow the steps:
- enter the value you need to find;
- click the Search button or
Enter; - click the
varrow next to the search string to expand the replacement function; - check the boxes next to the found values that you want to replace;
- enter a new value for replacement;
- click the Replace button.
- A message about successful replacement will be displayed.
- Close the search window.
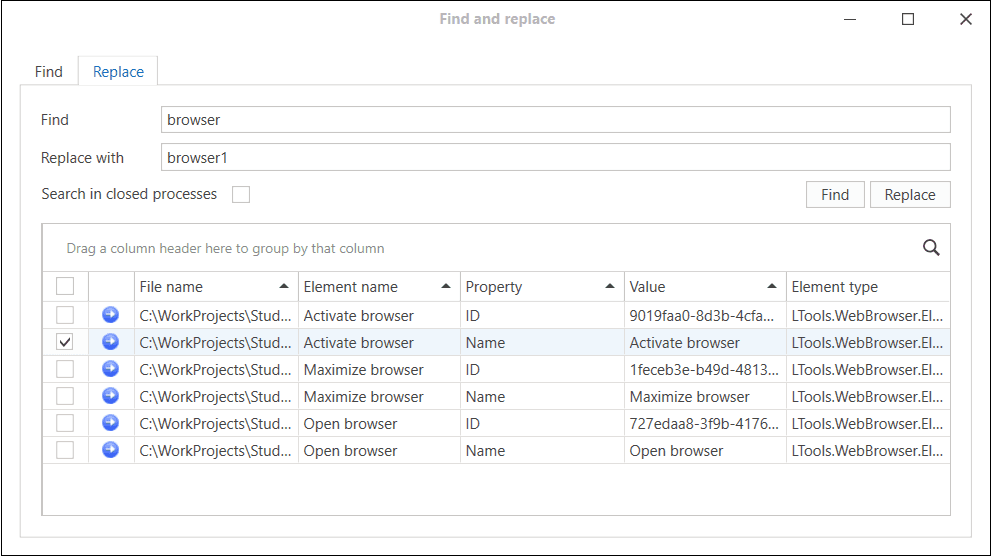
Since version 1.24.10, the design of the Find and Replace window has changed: a separate “Replace” tab was added.
Main changes:
-
Selection of properties for replacement: It is now possible to select in which property the replacement should be made, using checkboxes. This can be, for example, *Name or Text of the element, which is convenient in case the values of these properties match.
-
Confirmation window for changes: Before performing the replacement, a confirmation window appears, where the user can confirm or cancel the operation.
-
Replacement results: After successful replacement, its result is displayed — for example, it is indicated that 2 values were successfully replaced. In case of an error, a message with the number of values that could not be replaced will be displayed.
How to use the replacement function in the new dialog design:
- Go to the File > Settings > General menu and check the “Find and replace” function checkbox.
- Open the search window:
- click the Find button on the “General” menu tab;
- or use
Ctrl+F.
- Switch to the Replace tab
- Follow the steps:
- enter the value you need to find in the Find field;
- click the Find button or press
Enter; - check the boxes next to the found values that you want to replace;
- enter a new value in the Replace with field;
- click the Replace button.
- A message about successful replacement will be displayed.
- Close the search window.